Now that it's really starting to warm up outside, I just couldn't put it off any longer and had to get my vegetable garden plot ready for this year's planting season. As you may know, I already started some seeds indoors and have little tomato, cucumber, bell pepper, kale, herbs, and sunflower seedlings growing. These are all starting to hit the 3 to 4-inch height mark, and I am going to have to transplant them into bigger pots soon, to avoid the roots from getting too intertwined in the egg carton tray that I used to start the seeds.
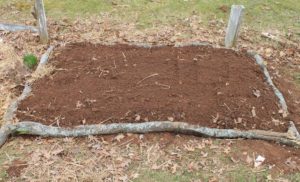
You can follow along with more recent pictures and updates on my plants on my Facebook and Twitter. While I will probably transplant them into bigger pots first before setting them out in the garden, I wanted to get the vegetable plot ready to go, in case the weather does warm up quickly (and stays warm) and ended up creating this 4x6 foot garden plot:
I have been reading more and more about "permaculture" lately, and how it can help gardeners improve their gardens. By putting to use, skills and techniques that will enhance your soil fertility, water retention, and sustainability, you can garden in an environmentally friendly way while at the same, time making less work for yourself and increasing your harvest. One of these techniques, known as Hugelkultur, is the simple method of building raised garden beds or mounds that will feed your soil over extended periods of time and help retain water better. I figure this is perfect for my garden!
Hugelkultur is a German word, which literally translates to "Hill Culture/Gardening" and has been practiced for hundreds of years throughout Europe. Though Hugelkultur is just now becoming a more popular gardening method in the last few years, the benefits of this style of gardening bed are countless. Besides the fact that they are by definition raised garden beds, they are a great way to reuse rotting wood and other garden compost material such as leaves and shrubs that you would otherwise set out to the curb. This has the benefit of returning nutrients back to the soil without the need for added fertilizers. Some of these beds have been known to "feed" the soil for 15 plus years depending on the amount and size of materials used. The wood that is placed in the center core of these raised mounds also helps retain moisture, slowly releasing it back into the soil during drier periods of the year, thus reducing the amount of watering required.
A Hugelkultur garden bed is basically a pile of dried logs, branches, and twigs, that is then covered with various layers of material, such as fallen leaves, straw, upturned sod, and plain cardboard before being covered with a layer of compost and then topsoil. While I chose to build mine in a hole I had dug to create a more conventional looking vegetable plot, most Hugelkulture beds form large mounds that can have sides as steep as 45 degrees. The logs and other woody material in the center break down over time, slowly releasing nutrients and creating air pockets that warm up the soil faster, and help regulate the soil temperature. As I mentioned above, the wood also helps retain moisture. These types of garden beds can be used to redirect water runoff and in some cases dam the water to allow for slower distribution of the water in the ground. Care needs to be taken as a Hugelkulture bed is not as solid as a "swale" or "dam" and if too much water collects or flows past, it may start to erode the structure which may cause it to collapse and break apart.
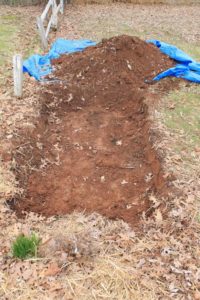
To create my hugelkultur inspired garden bed, I wanted to use the space that was currently occupied by a garden plot. Instead of building a two to three-foot mound though I wanted to create a slightly raised garden bed that would appear as a normal garden bed, but offer the same fertilizing and water-retaining properties as a traditional hugelkultur mound. I started by digging up my current garden plot and essentially emptying it out of all the soil and compost I had mixed in the year before. I dug about 1 foot down, as this was the depth I had tilled the soil to the year before. This way I wouldn't have to contend with rocks and roots that are so abundant in my backyard. I shoveled all the soil onto a tarp, to ensure that I would be able to get most of this soil back onto my hugel-styled plot and not ruin the existing lawn.
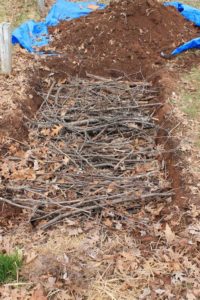
Once I had emptied the current vegetable plot of soil, I bundled up all the branches twigs, and small logs that had fallen during the winter storms from the maple trees in our yard. Most of these were already dead and not "live" branches or logs. I cut them into 4-foot lengths. This allowed me to place them in the hole without random ends sticking out the sides. Avoid using woods such as cedar and black locusts, as they are naturally rot-resistant and will not break down to provide nutrients to the soil. This bottom layer of branches, I covered with almost 2 feet of dried leaves and leftover straw, which I had piled in a corner of the yard the previous fall.
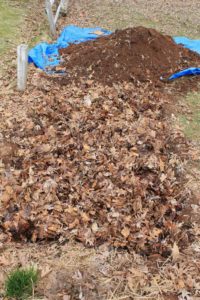
The hole I had dug was now starting to look quite full and was even overflowing a little. It is worthwhile to note that as soon as you start piling the dirt back on, the leaves will compress quite significantly. First, I made sure to drench the logs and the leaves with some water from my rain barrel though, to help kick-start the decomposition process. I then continued to shovel the topsoil and compost back onto the pile of wet leaves and branches. By the time I had filled in the hole again, the garden bed was now a good 1 foot higher than it had been to begin with. While this was not as "high" of a mound as I had hoped for, I was pleased with the fact that the garden plot still looked level with the surrounding area. It had significantly sunken into the ground the year before as I had removed quite a few rocks and roots from the ground underneath it. Next time I'll simply have to add more logs and branches to raise the mound higher!
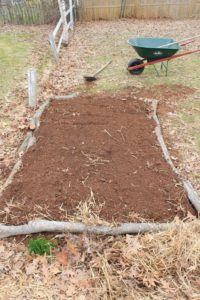
Since I am on a bit of a budget right now and don't have access to cedar planking, I would ideally like to build raised garden bed sides. I opted instead to use the cut logs from a very large maple tree we had cut down last year. These logs will simply be a temporary border, but serve their purpose of outlining the vegetable plot and keeping the soil slightly mounded. I hope that this little garden plot will help hold water longer than it did before and enable my plants to grow stronger and faster than in previous years! I will be building one more such garden bed this year, hopefully making it a little higher and "mound" style, and am excited to see what the results will be. At the very least I will use up and get rid of all the unsightly wood branches and leaves that have collected in the yard over the fall/winter!



Teresa
This is such an interesting concept. I've been using square foot gardening methods for years and have gotten great results, but the idea of a self-feeding garden is really appealing. There's so much soil loss happening around the world that helping to create it should be every gardener's goal.
Redawna
If I was still in the country I would definitely try this type of garden. The idea of it being fed from the under side is pretty cool! And it should keep the weeds to a minimum.
I have always been a strong proponent of mulching. My very first garden had an extreme thistle problem and the soil was hard and oviously lacking nutrients so I was mulching with thick layers of newspaper, cut grass and leaves. It worked very well. A farmer would come in the spring with his tractor mounted tiller and he would till it to a depth of a foot and I would start all over again.
I can't wait to see how your garden grows!