Perfect for special occasions and family get-togethers, an old fashioned apple pie made from scratch is sure to impress everyone. With its perfectly baked lattice crust, a mix of sweet and slightly tart apples, making the 'perfect' apple pie really isn't that hard, even for a first-time baker!!
Of course, making an old fashioned apple pie just wouldn't be the same without a rich flaky, crust to go along with it. You can substitute a store-bought pie shell if you really want to, but I would strongly recommend making your own pie dough from scratch. It is very easy to do and takes only 5 to 10 minutes to put together. Make the dough the night before you plan on baking the apple pie, and the dough will be ready to go by morning.

Featured in: Thanksgiving Menu Ideas.
This post contains affiliate links for which I may be compensated if a purchase is made through the links provided. For more information please read my affiliate disclosure.
Table of Contents
What Are The Best Apples For Old Fashioned Apple Pie?
To start, we will have to make our own apple pie filling. At this point, you may be asking yourself, which apples are best for making pie filling? Fortunately, there are a few varieties ideally suited to baking, and are sometimes called bake apples.
Bake apples, provide a good balance of tart and sweetness, and most importantly, hold up well under heat. In other words, they do not just liquefy, but remain somewhat firm, and hold their shape. Cortland and Granny Smith are two popular varieties used in baking, but you can easily mix different apples to create a sweeter flavor as I have done by adding some Macintosh apples to the pie filling.
A few other varieties include:
- Fuji
- Golden Delicious
- Gravenstien
- Honeycrisp
- Northern Spy
Of course, other varieties are excellent for baking as well, but you should be able to find all of these at your local market.
Making Old Fashioned Apple Pie Filling From Scratch
There aren't a lot of people I know who don't like apple pie. It is one of my all-time favorite desserts, especially my Grandmother's German homemade apple pie recipe. My mother made this for my brothers and me countless times. It's a fairly basic and easy-to-put-together apple pie recipe, especially if it's your first time making a pie from scratch. It contains no preservatives or thickening agents and is an honest to goodness, old fashioned apple pie.
For this homemade old fashioned apple pie you will need the:
- 1 x 9" Pie shell and dough for a top cover or lattice
- 1.5 lb Macintosh Apples - peeled and cored
- 1.5 lb Granny Smith Apples - peeled and cored
- 1 tablespoon Butter (unsalted if you can)
- ¾ cup Sugar
- 1 teaspoon Cinnamon
- ¼ tsp Nutmeg
- ½ cup Organic apple juice
- 1 Tbsp Local honey
- 1 Lemon wedge
- 1 Egg (for egg wash)
Making The Filling for Old Fashioned Apple Pie
The hardest part of making apple pie filling is peeling and cutting the apples! Get all of your apples ready by washing them first to get any pesticide residue off of them. Yes, you are also going to peel them, but if you don't wash them first the residue will get on your knife/peeler and then right back onto the flesh of the apples.

Once washed, I core my apples first, using an apple corer. If you don't have one handy you can always cut the apples into quarters and then remove the core and seeds. After the apples are all cored, I simply peel them with a vegetable peeler to reduce the amount of waste. Once the apples are peeled, I quarter them and then slice them into quarter-inch thick slices. Make sure they are somewhat evenly sized so that they cook evenly on the stove.
After you cut your apples, you place them into acidulated water. This is very simply, a bowl of cold water with a wedge of lemon squeezed into it (vinegar can also be used). The acid in the lemon will prevent the apples from turning brown while you finish peeling and cutting the rest.
- Chef Markus
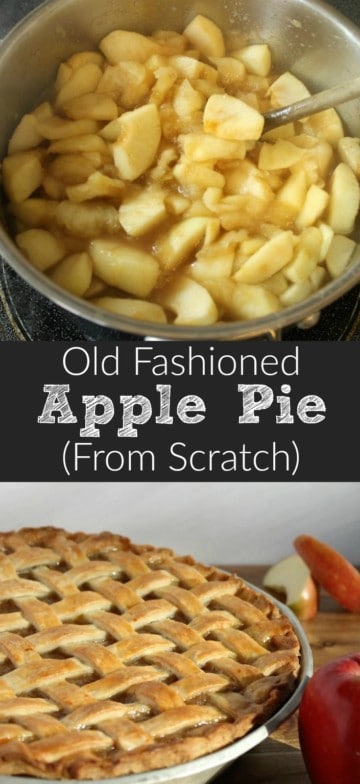
Melt your 1 tablespoon of butter in a pot over medium-high heat, and then add all your sliced apples at once. Add the ¾ cups of sugar, cinnamon, and nutmeg, and stir them in. As you stir the filling occasionally, the apples will start to release their juices. Once you have about an inch of liquid in the pot, cover the whole thing with a lid and turn the heat down to low.
Let the apples cook for about 10 minutes before removing the lid and giving the apples a good stir. Stirring the apples at this point will help break them down a little. I like to keep my filling a little chunky to add texture to the finished pie, but you could cook the apples until they are smooth and puree-like. Now add your apple juice, honey, and a pinch of salt. I add the apple juice just to give the filling a little more punch and also to adjust the consistency of the filling. Cook your filling for another 10 minutes and make sure to taste it!
All of the apples should be cooked and soft. Depending on how long you cook the filling, it will be thicker or runnier. Transfer the filling from the hot pot into a bowl or other container that you can place in the fridge for it to cool. Stir it once in a while to help it cool faster.
The Pie Crust for Old Fashioned Apple Pie
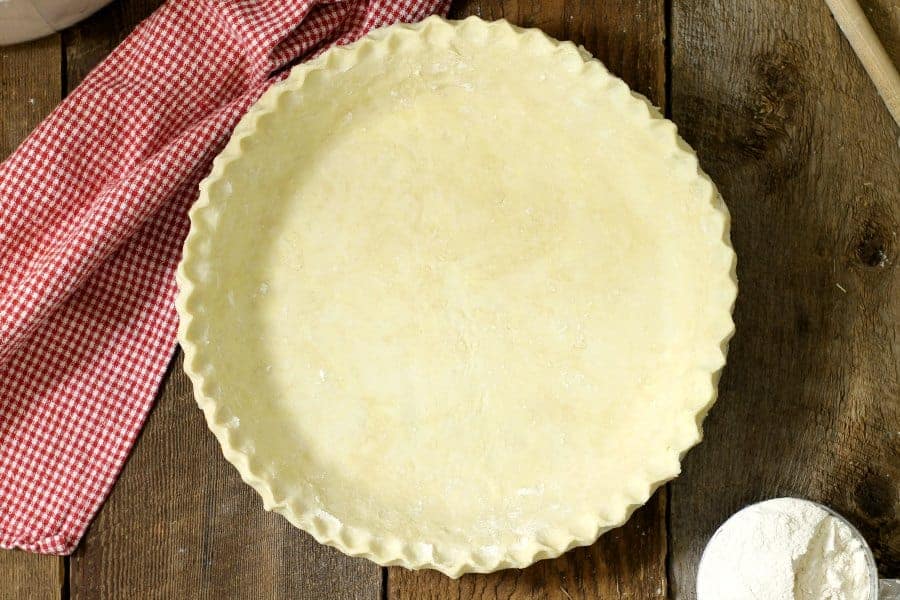
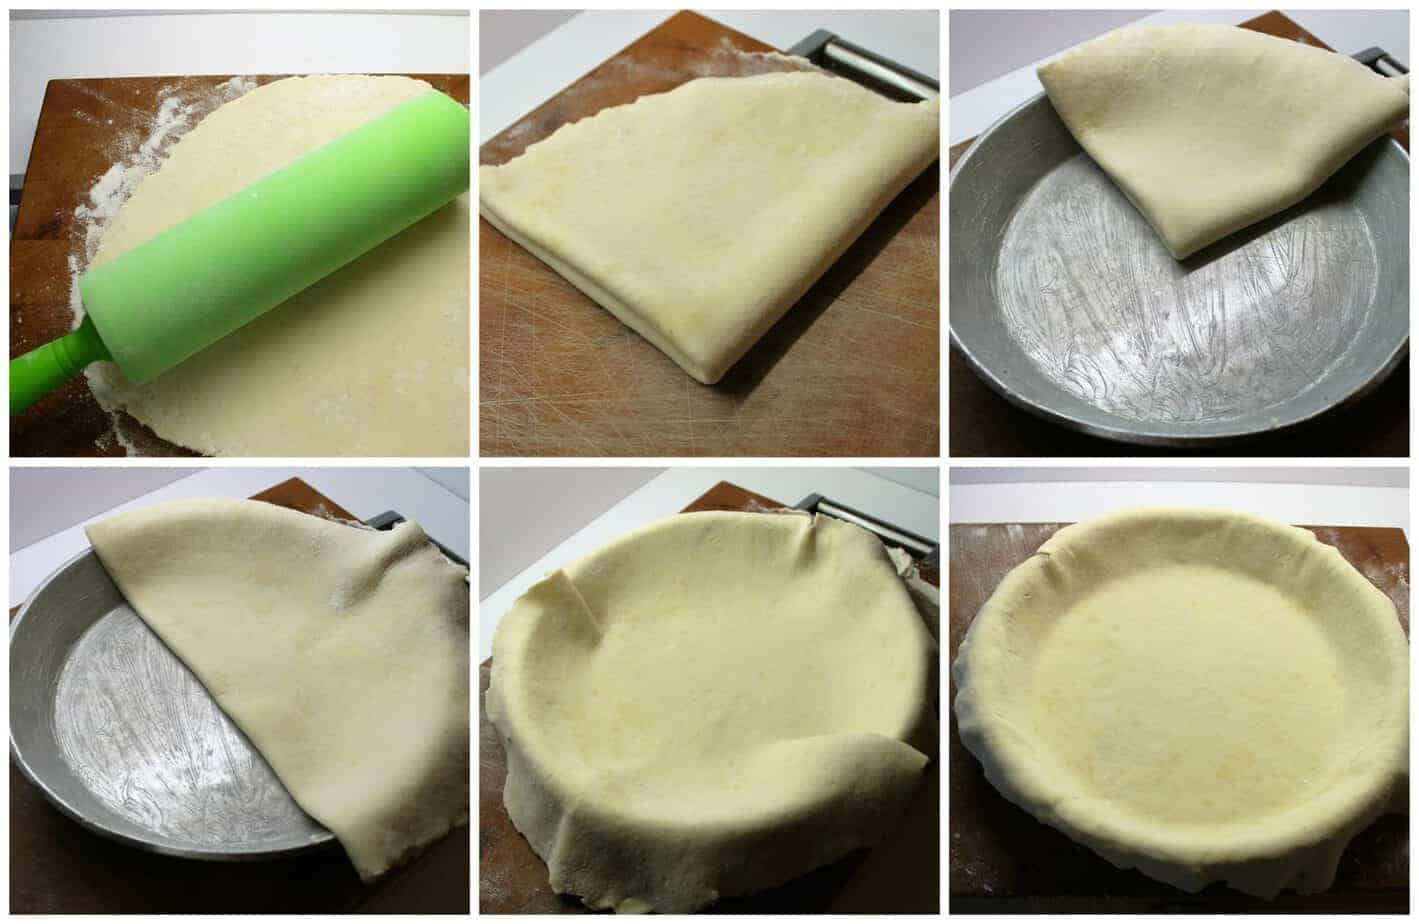
While the homemade old fashioned apple pie filling cools, pre-heat your oven to 400°F (204°C), and if you haven't done so already, roll out your pie dough and place it in a greased pie pan. I use cold butter to grease the pan. Take a chunk of butter and run it over the pan until there is a thin layer covering every part of the inside. I bought my pie pan at a professional kitchen supply store. They are made of metal and are pretty handy things to have around. My pie pan also doubles for roasting chicken and heating other things in the oven, and the high sides prevent any juices from spilling out.
Once you have rolled out the pie dough on the counter, fold the dough over on itself to move it to the greased pan without tearing or stretching the dough. Unfold the dough in the pan. Leave enough excess pie dough hanging over the edge of the pan, so you'll have enough to attach a lattice or pie top too. You can always trim off the excess later!
It's a good idea to chill your pie shell before filling it. This will create a crisper crust. 30 minutes to an hour in the fridge is ideal and will be long enough to make the dough firm.
As soon as your filling has cooled, you can pour it into your chilled pie shell. Don't fill the pie all the way to the very top edge, leave about a centimeter of space at the very least. If you fill the pie to the edge, your filling may bubble over while the pie bakes.
Creating That Perfect Lattice Top
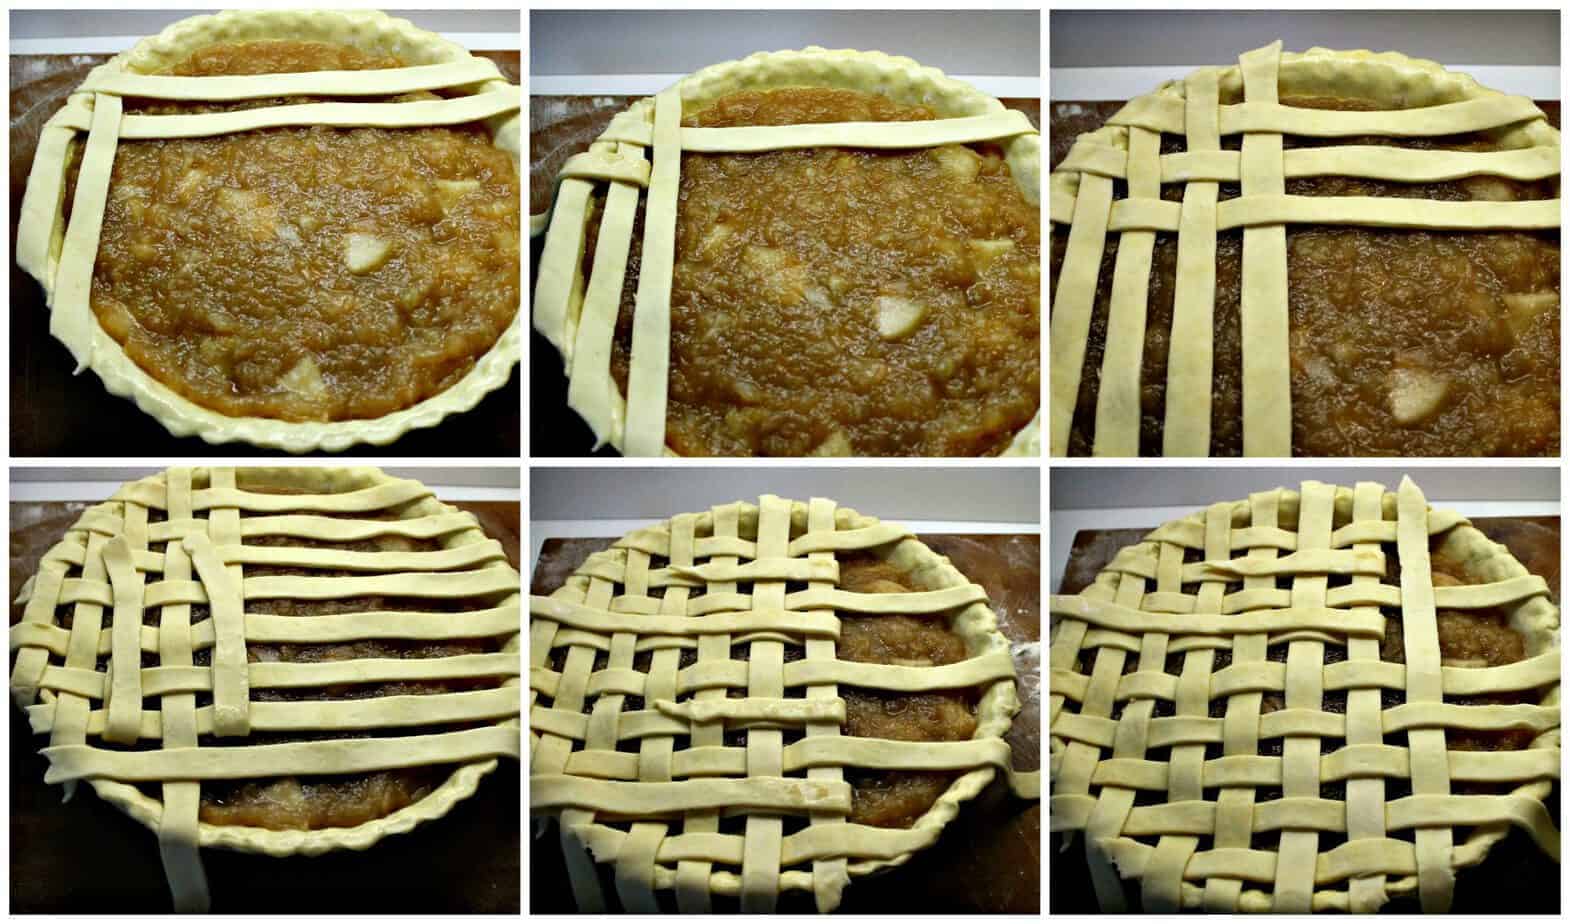
Now for the fun part! Making a lattice top of your old fashioned apple pie! This part can seem intimidating, but it really isn't all that difficult to do if you follow the instructions below. Roll out some more pie dough the same thickness as the pie shell. It doesn't have to be round this time, just make sure you have enough length to be able to cut strips the same length as the diameter of the pie (9" in this case).
Brush the edges of the pie shell with an egg wash (1 egg beaten with a splash of water). This will glue your pie dough strips in place.
Start on one side of the pie, and work your way across vertically, then horizontally, by placing the strips alternately under and over each other. Once you have a few strips placed, you can speed up the process by pulling back the strips of dough perpendicular to the one you need to place. It takes a second to get the hang of it, but as long as you make sure that the strips are going over and under each other like a weave, you are doing okay.
Once the whole old fashioned apple pie is covered, pinch the edges together to make sure the lattice will not loosen from the bottom shell. You can also use the tines of a fork to press the edges of the lattice to the pie crust bottom and seal the edge. Brush the top of the apple pie with your egg wash. This will help brown the top and produce a wonderful golden brown crust.
Baking The Old Fashioned Apple Pie
Bake your pie in the preheated oven at 400F (204C) for forty minutes to an hour, until the top of the old fashioned apple pie is nice and dark golden brown. Take the pie out of the oven and let it cool on a wire rack. If you leave it sitting just on the countertop, the bottom of the pie will not stay crisp. It needs to cool fairly rapidly so that the pie doesn't "sweat" and get a soggy crust.
Once your homemade apple pie has cooled, cut it into 8 pieces, and serve with whipped cream, vanilla ice cream, or just on its own! Let me know in the comments if you have tried this recipe and how it turned out!
More Apple Recipes
Have a craving for more apple recipes? Check out my:
- Instant Pot Apple Sauce
- Apple Chip Chicken Spinach Salad
- Gravenstein Apple Butter
- Mulled Apple Cider
More German Recipes
If you loved this German recipe, try out some of my other traditional German foods such as these:
- Hearty German Goulash
- German Schnitzel
- Jägerschnitzel (Hunter's Schnitzel)
- Braised German Red Cabbage Recipe (Rotkohl) with Blueberries & Cloves
- German Meat Fondue (Fleischfondue)
- Spaetzle Noodles
- Käse Spaetzle with Caramelized Onions (The Ultimate Mac & Cheese)
- German Glühwein - German Mulled Wine
- How To Make German Style Sauerkraut
- German Cucumber Salad - Gurkensalat
- German Rosinenbrot (Raisin Bread)
- German Sugar Candied Almonds (Gebrannte Mandeln)
- or my Grandmother's Apple Pie!
Made the recipe? Comment & Rate it below, then take a picture and tag me on Facebook. For more from scratch recipes, follow me on Facebook & Pinterest.
Recipe
Old Fashioned Apple Pie
Ingredients
- 1 x 9" Pie shell and dough for a top cover or lattice
- 1.5 lb Macintosh Apples peeled and cored
- 1.5 lb Granny Smith Apples peeled and cored
- 1 tablespoon Butter unsalted if you can
- ¾ cup Sugar
- 1 teaspoon Cinnamon
- ¼ teaspoon Nutmeg
- ½ cup Organic apple juice
- 1 tablespoon Local Honey
- 1 Lemon Wedge
- 1 Egg For egg wash
Instructions
- Filling:
- Core and peel your 3 lb of apples. Keep them in lemon water to prevent them from turning brown.
- Melt 1 tablespoon butter in a pot over low heat, and then add your sliced apples, cinnamon, nutmeg, and sugar.
- Cook the filling for about ten minutes covered with a lid, making sure to stir occasionally, to prevent scorching on the bottom. The apples should release liquid, and slowly cook down, and break up as you stir the filling. I like to keep my filling slightly chunky, but you can cook the apples until they turn into a puree.
- Add your apple juice, honey and a pinch of salt. Cook for another 10 minutes or until the desired consistency is reached. The filling should not be runny, and just slightly thick and chunky.
- Cool the filling in the fridge before using in a pie shell.
- Baking the pie:
- Fill a 9" pie shell up to within half an inch of the top edge with the cooled pie filling.
- Cover the filling with either a pie top, or create a lattice top. Then crimp the edges so they hold together.
- Brush the top of the pie with eggwash (1 egg mixed with water) for a golden brown crust
- Bake in a preheated oven at 400°F for forty minutes to an hour.
- Cool the pie on a wire rack to prevent the dough from getting soggy.
Nutrition
Nutrition info is auto-generated. This information is an estimate; if you are on a special diet, please use your own calculations.






Gagan
I wanted to know one thing when I bake the pie my base crust is not crispy and the lattice part too is baked but inside part not so well cooked
Chef Markus Mueller
Hey, There could be many reasons for this. How thick is the pie crust? If it's to thick it may not cook fully. Do you use a storebought crust or homemade crust? If it's storebought do you fill the crust while it's frozen or let it thaw first? Since the crust is not blind baked and is cooked with the filling inside, it is normal that pie dough on the inside will be a little softer as it absorbs some of the moisture from the apple pie filling. Before baking the pie, the filling needs to be fully cooled and set as well so that it doesn't soak into the crust to much. Feel free to email me (markusjhmueller@earthfoodandfire.com) or message us via our facebook page if you need more help troubleshooting!
Yvonne
Hello,
thank you, for the Recipe.
It was actually easy to make and really delicious.
Have a great day.
Greetings,
Yvonne
Chef Markus Mueller
Thanks Yvonne! I'm glad you enjoyed the pie!
Maria
Markus, what an amazing looking pie! I just had to come by and thank you for sharing your grandma's (adapted) recipe! Will definitely be making this with all the apples I picked last week-end. Great post! Thanks for sharing.
Anne
Great recipe! Easy to follow and my pie turned out really well. My family gave it rave reviews.
markusjhmueller@earthfoodandfire.com
Glad to hear it turned out so well! The picture you sent me looked so good!
Sarah Ochocki
This pie looks so good! Your lattice top is beautiful.
markusjhmueller@earthfoodandfire.com
Thanks Sarah! I found the key to a good looking lattice crust is simply to make sure all the dough strips are cut evenly before placing on the pie!