Learning how to sharpen kitchen knives is an absolute must in a professional or home kitchen. Without a sharp knife, despite what you may think, you are more prone to cutting yourself.
The chances of cutting yourself badly are also higher with a dull knife since more force is required to get a dull knife through various food items, and thus more likely to slip. A razor-sharp knife should require very little force and effort to cut and slice through food. If you are not used to using a sharp kitchen knife, yes, you may nik yourself more often initially, but this only makes you more careful and in the long run a better cook. This is why learning how to sharpen kitchen knives is so important.
If you haven't yet purchased a good quality chef's knife, make sure to read our guide on choosing the right chefs knife!

This post contains affiliate links for which Earth, Food, and Fire may be compensated. This allows us to keep providing you with new recipes and other culinary knowledge. For more information please read my affiliate disclosure.
Benefits of sharpening your own knives
Most people, (and even cooks) I know, will bring their knives to someone who offers a "knife sharpening service". While there is nothing wrong with this, it can become expensive very quickly. Especially since most places charge one to two dollars per blade inch.
If you have a 10 inch chef's knife, a boning knife, and a paring knife that all need sharpening, you are all of a sudden looking at a bill ranging anywhere from 25 to 40 dollars. All for something you can learn to do yourself for free!
Most professional cooks will learn how to sharpen kitchen knives either in school or through on the job training. Some will even compete with fellow co-workers for who has the sharpest knives! Nothing bugs me more in a kitchen, than having someone just using my knife without permission. I put a lot of time and effort into keeping my knives sharp enough to shave with, and don't want someone else messing with that edge!
How to Sharpen Kitchen Knives - Video Tutorial
So how do you sharpen kitchen knives properly?
So how do you go about becoming a knife-sharpening guru!? Ironically, it takes patience and practice...lots of practice. Your first go at sharpening a knife might not produce a samurai sword capable of slicing watermelons in half, but like with anything in life, if you stick with it, you will get better and develop a "feel" for how that particular knife needs to be sharpened.
Materials Needed
You will need what's called a whetstone. This is either a natural or synthetic stone, usually in a rectangular shape, that is used to sharpen the edge of your knife. Whetstones can be used to sharpen any kind of metal tool such as chisels, razors, and even scissors.
Whetstones generally come in three stages of "grit" or coarseness. The lower the grit (150-1000) the rougher and softer the abrasive material of the stone. These low grit stones are used for preparing and creating a proper edge on the blade.
The high grit stones (4000-8000+) are used to refine and polish the blade edge.
The Japanese also use what's called a Nagura stone, which is used to help create a slurry on very fine grit stones. This helps the blade slide smoothly along the stone and also prevents the knife from leaving microscopic particles embedded in the whetstone, which would otherwise cause imperfections in the blade.
If buying a whetstone though make sure to purchase one meant for knives as others will have different grits that may not work as well with a kitchen knife. I use a 1000/4000 grit combination stone by King and an 8000 grit stone by Bester which I bought at Lee Valley.

Whether you choose a natural or synthetic stone will make almost no difference to a beginner or home knife sharpener, but I would suggest using a water stone and not an oil stone.
Oil stones simply require the use of mineral oil to lubricate the stone, whereas water is of course free!! Make sure you always soak your water whetstone before using it! You want it to absorb enough water to not dry out during use! Synthetic stones usually have a more consistent abrasive material while natural whetstone stones may have slight imperfections in them.
Of course, high quality and rare natural stones do exist such as the whetstones from Japan or the Belgian Coticule stones from Belgium which were even used by the Romans!
Sharpening Kitchen Knives
Enough about the technical side of the sharpening stones though. How to sharpen kitchen knives that are dull!? The method itself is very simple, the execution, of course, is what takes practice.
Depending on how dull the blade is there are generally three steps involved in knife sharpening:
- The first step is the actual sharpening or shaping of the blade edge, which consists of passing the blade over a rough(low grit) whetstone to remove metal from the blade and create a new "edge".
- The second step uses a variety of whetstones which are progressively finer (higher grit), creating a smoother and smoother edge each time.
- The final step consists of buffing the blade, usually with a leather cloth (called a strop) specific to this purpose. Most kitchen knives will only require the first two steps since the blade will never have to be so sharp as to "shave" with, though after the second step if you have used a fine enough stone you will be able to shave hair off your skin with no trouble.
Tips & Tricks How to Sharpen Kitchen Knives
Before starting make sure the Waterstones have been submerged in water for at least 30 minutes to allow them to absorb with water.
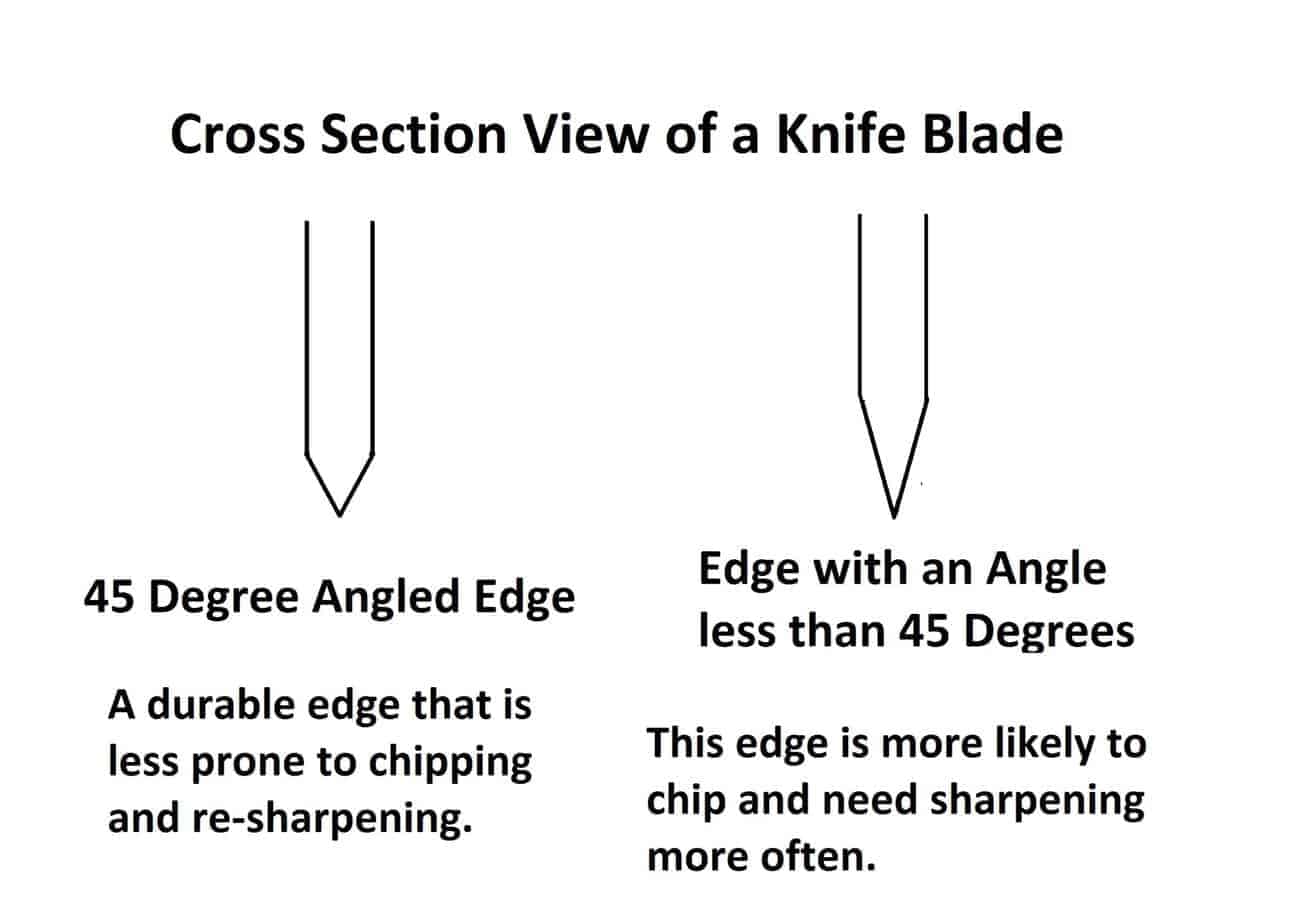
When beginning with the first step (setting a new edge), start by splashing the stone with water. This provides a lubricant for the blade to slide along and helps remove microscopic pieces of metal. It is generally recommended to hold the blade at a 45 degree angle perpendicular to the stone surface while passing the blade over the whetstone on each side.
This creates a consistent edge that will stay sharp for a reasonable amount of time before needing re-sharpening yet is not so thin that it will break or crack when placing pressure on the blade. The lower the angle in the initial sharpening, the sharper yet more brittle the blade can become. A whetstone with a grit of 500 - 1000 is ideal for shaping the edge of the blade.
In the second step, you simply refine the edge. By running the knife blade over progressively finer grit whetstones (3000-12000+) you refine and polish the initial edge that you created. The more you refine the edge the sharper it will become. I usually go from a 1000 grit stone to 4000 grit, and then finish with an 8000 grit stone. I then hone the knife on a steel and wipe it with a clean cloth to remove any leftover dirt and metal particles.
Checking The Sharpness
To check the sharpness of the blade, you can cut through a hard vegetable like a carrot or hold the knife with the blade edge facing up and drop a tomato on it. The knife should cleanly slice the tomato in half. Lacking spare vegetables, you can also scrape your fingernail across (perpendicular to) the edge of the blade. The knife should "stick" and not slide across the nail. You can watch a video on how to sharpen kitchen knives at home here:
Sounds/ looks simple, doesn't it!? The process of how to sharpen kitchen knives is quite simple, yet at the same time, it takes a bit of practice to get the hang of how exactly to hold the knife.
Did you find this guide useful?? Comment & Rate it below, then tag me on Facebook. For more DIY gardening tips & homecoming from scratch recipes follow me on Facebook & Pinterest
This post contains affiliate links for which I may be compensated if a purchase is made through the links provided. For more information please read my affiliate disclosure.


gail
I see many "angle guides" for sharpening at Amazon; however, these rarely are more than 22 degrees (15-22). You recommend 45 degrees. Is there an angle guide for 45 degrees?
Chef Markus Mueller
Hi Gail, I love that you picked up on this! You most likely wont find an angle guide for 45 degrees. This is because the angle guides are meant to be used on each side of the knife. Since most western kitchen knives are sharpened on both sides, using a 22 degree angle guide (you sharpen one side first, then the other) would result in a 44 degree edge when sharpened on both sides. You can learn more about knife angles and the differences they have on the edge of a knife here: https://www.sharpeningsupplies.com/Detailed-Discussion-on-Knife-Sharpening-Angles-W28.aspx
Redawna
I am petty excited about this post!!! I have been wanting to learn how to sharpen my knives for a long time. Looking forward to trying it. Thanks for the informative post. I will report back on how I do.
Have a fantastic weekend.